
Guide
How to use Clipper X
From your free license key to your first vertical clip. Every picture on this page is a screenshot of the app.
Step 1
Install
You need a Windows PC, an internet connection and a free license key. Any graphics card works. An NVIDIA card is optional and makes exporting and captions faster.
- Download the installer from the official Clipper X link. If you do not have the link, ask on Discord.
- Double-click
ClipperXSetup.exe. - Windows may show a blue security warning, because the installer is new to Windows. If you got the file from the official link, select More info, then Run anyway.
- Follow the steps. Leave Add a desktop shortcut ticked if you want one.
- At the end, keep Open Clipper X ticked and finish.
If your antivirus blocks the installer, do not turn the antivirus off. Ask for help in a Discord ticket first.
Check your download (optional)
Every file has a unique code called a SHA-256 fingerprint. If yours matches the one below, it is the real Clipper X installer, unchanged. In Windows PowerShell, run Get-FileHash ClipperXSetup-1.0.0.exe in your Downloads folder and compare.
Step 2
Activate
- Join the Clipper X Discord, find the Get your Clipper X license key panel and press Get a license key. A private ticket opens.
- If your Discord account is over a year old, the bot sends your key to you in a direct message straight away; newer accounts wait for staff to approve. Keep that message so you do not lose your key. If your DMs from server members are turned off, press Reveal my key in your ticket instead and copy the key right away, because it is shown once.
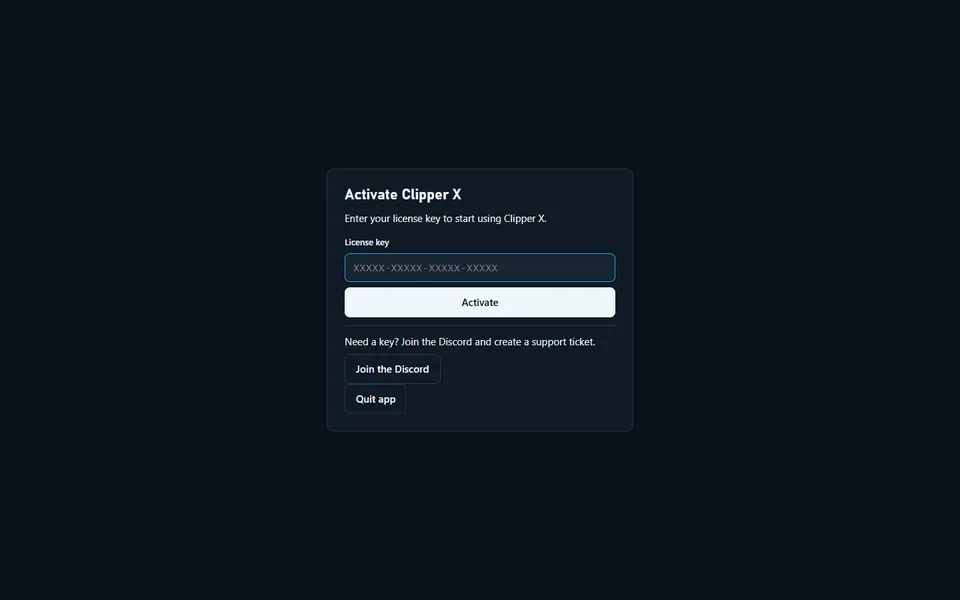
- On the Activate Clipper X screen, paste it into License key.
- Press Activate.
Keep your key private, and never post it in a chat or ticket. A key lasts 30 days, and internet is required: Clipper X checks your license when it starts and again while it runs.
Step 3
Run the Setup check
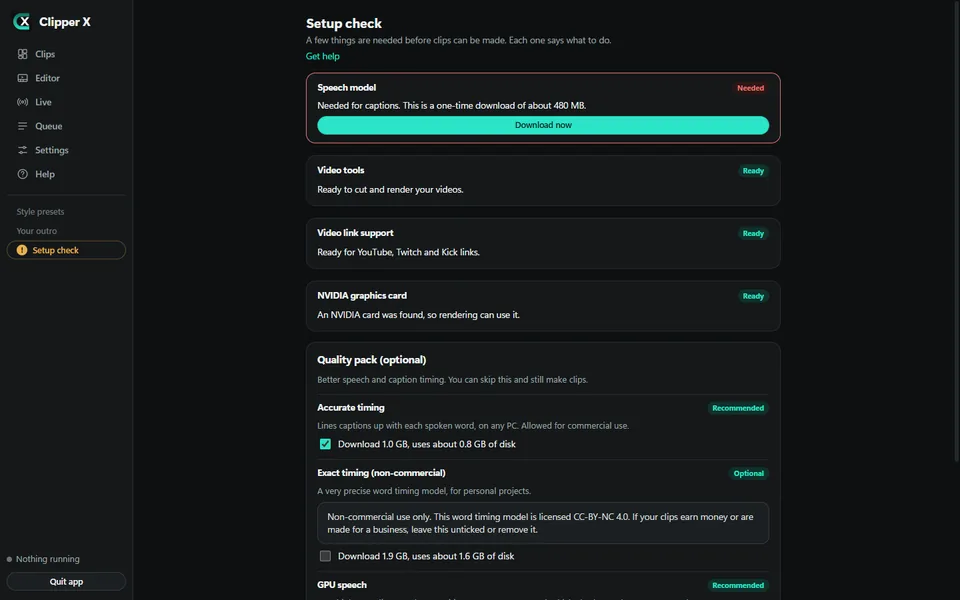
Setup check opens by itself the first time. Later, find it in the left menu, under the divider, or in Settings. If something needed is missing, a warning sign appears next to it in the menu.
- Wait for the check to finish. All the results appear together.
- Next to Speech model, press Download now. It is a one-time download, and captions need it.
- Wait until you see “Everything needed is ready. You can start making clips.”
- The Quality pack (optional) can wait. Until you add it, captions use Basic timing.
- Press Continue to the Editor.
No NVIDIA card? That item is only Optional. If an item says Not checked, press Check again.
Step 4
Open a video or link
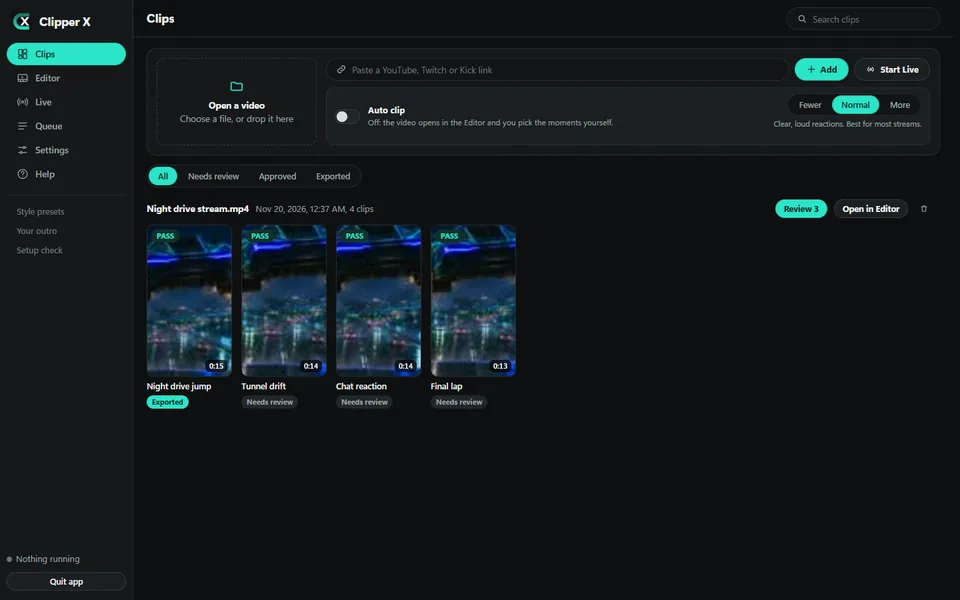
Start in Clips. First choose Auto clip on or off.
- Off: the video opens in the Editor, and you pick the moments yourself.
- On: the app finds the moments and makes the clips for you. Choose Fewer, Normal or More to set how many it catches. Without an AI service, it picks the loudest moments.
- Press Open a video and pick a file, or drop the file on it.
- Or paste a public YouTube, Twitch or Kick link into the link box, read the warning, tick its box and press Add.
Supported files: MP4, MKV, MOV, WebM, AVI, M4V, TS and FLV. Clipper X works on its own copy, so your original file is not changed.
Clips shows every clip, grouped by video. Each card has a quality badge: PASS, WARN or FAIL. Filter with All, Needs review, Approved or Exported. For a stream that is live right now, press Start Live.
Only clip videos you own or have permission to use. A public link does not by itself give you permission to reuse a video.
Step 5
Review your clips
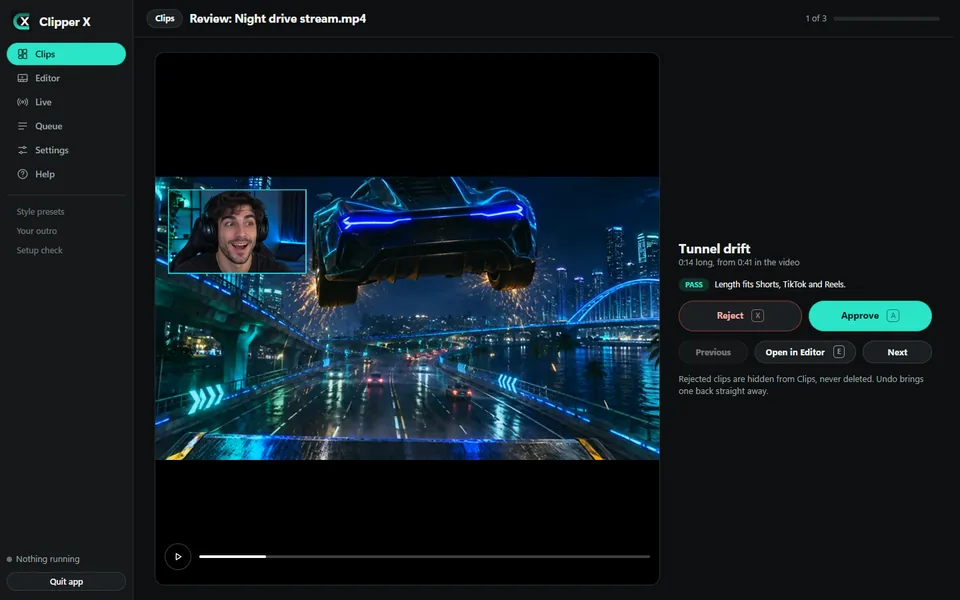
Review plays each new clip, so you can keep the good ones fast.
- In Clips, press Review next to a video. The button shows how many clips still need review.
- Watch the clip. It shows its length, where it is in the video and its quality checks.
- Press A to approve it, or X to reject it. The next clip opens.
Press E to open the clip in the Editor. Left and Right go to the previous or next clip.
Rejected clips are hidden from Clips, never deleted. Press Undo on the message to bring one back.
Step 6
The Editor
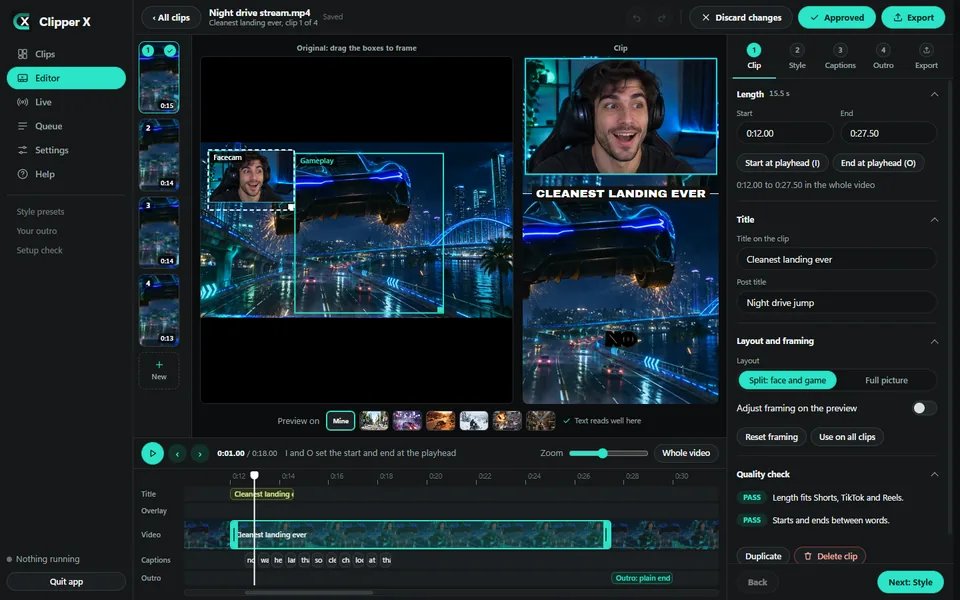
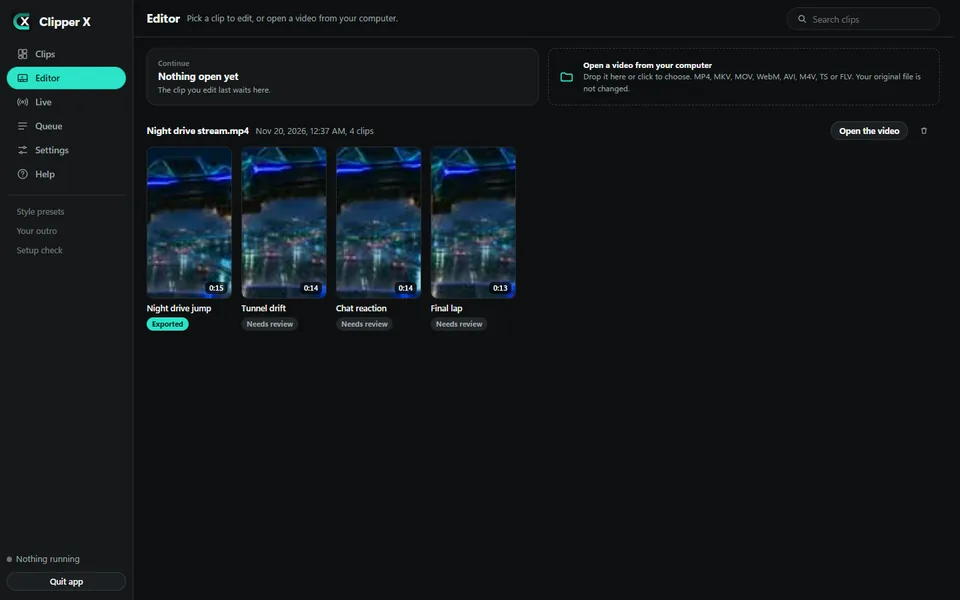
Open Editor. Continue opens the clip you edited last. You can also pick any clip, or press Open a video from your computer.
- Left: this video’s clips. Click one to open it. Press New to mark another.
- Middle: Original shows the whole video. Clip shows the vertical clip exactly as it will look.
- Right: the steps 1 Clip, 2 Style, 3 Captions, 4 Outro and Export. Click a step, or use Back and Next.
- Bottom: the timeline, with the tracks Title, Overlay, Video, Captions and Outro.
Quick way to mark a moment: watch until just after it and press C. This saves the last 30 seconds as a clip. Exact way: press I where it starts and O where it ends.
To trim, drag the clip’s teal edges on the timeline, or type new times in Start and End in step 1 Clip. There you also set the Title on the clip.
| Key | What it does |
|---|---|
| Space or K | Play or pause |
| J | Back 5 seconds |
| L | Play. Press again while playing to go faster |
| Left / Right | Back or forward 1 second |
| Shift + Left / Right | Back or forward 1 frame |
| I / O | Set the start / set the end |
| C | Clip the last 30 seconds |
| Ctrl + Z / Y | Undo / redo |
| Esc | Remove a start mark, or leave framing |
Hotkeys do not work while you are typing in a box. Your edits save by themselves.
Step 7
Frame your clip
Framing decides which parts of your wide video appear in the vertical clip. Set it in step 1 Clip, under Layout and framing.
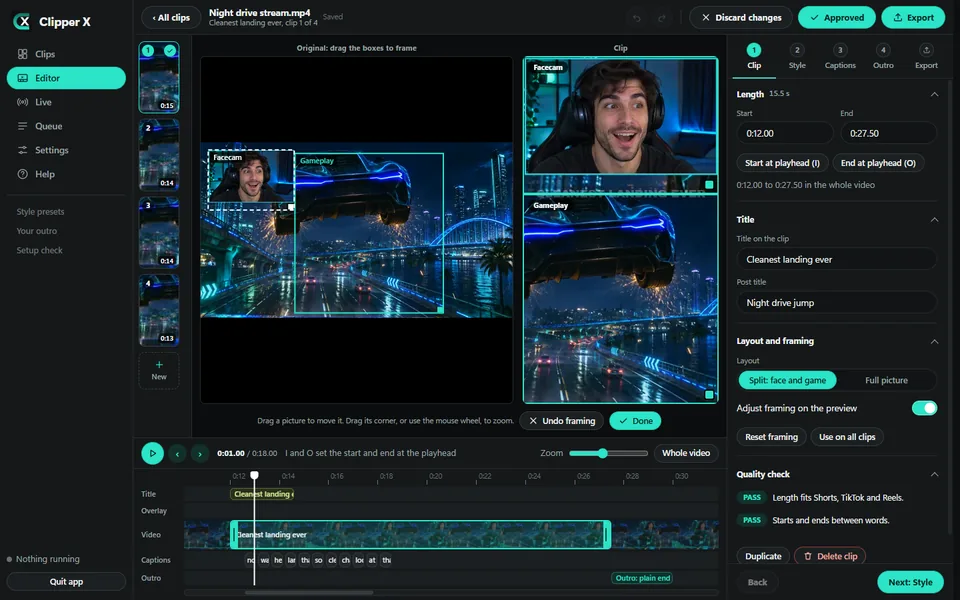
- Choose a Layout: Split: face and game puts the facecam on top and the gameplay below. Full picture fills the whole clip.
- Pause on a typical moment. The framing stays the same for the whole clip.
- Turn on Adjust framing on the preview.
- On the Clip preview, drag a picture to move it. Drag its corner, or use the mouse wheel, to zoom.
- Press Done, or Esc, when you are finished. Undo framing takes your change back.
You can also drag the Facecam and Gameplay boxes on the Original picture. Press Use on all clips to copy the framing to every clip in this video.
Step 8
Style
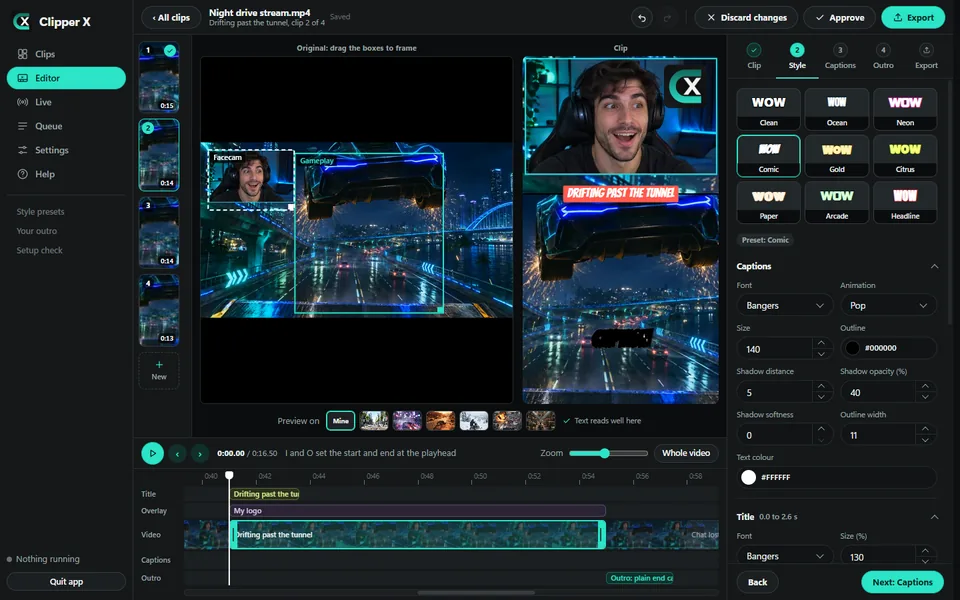
Step 2 Style sets the look of your captions, title and divider. The Clip preview changes straight away.
- Click a preset tile, like Clean, Ocean, Neon, Comic or Headline.
- Under Captions, choose a font and an Animation: Pop, Bounce, Slam, Slide or Glow.
- Set the Size, Outline colour, Outline width, the shadow and the Text colour.
- Adjust the Title and the Divider.
Click a colour to open the picker. Choose Solid for one colour, or Gradient for up to 4.
Under Logo and images, press Add a logo or picture (PNG, JPG or WebP). Drag it on the Clip preview to place it, and drag its block on the Overlay track to choose when it shows.
Press Use on this video’s clips to give every clip this look, or Save as preset to keep it.
Step 9
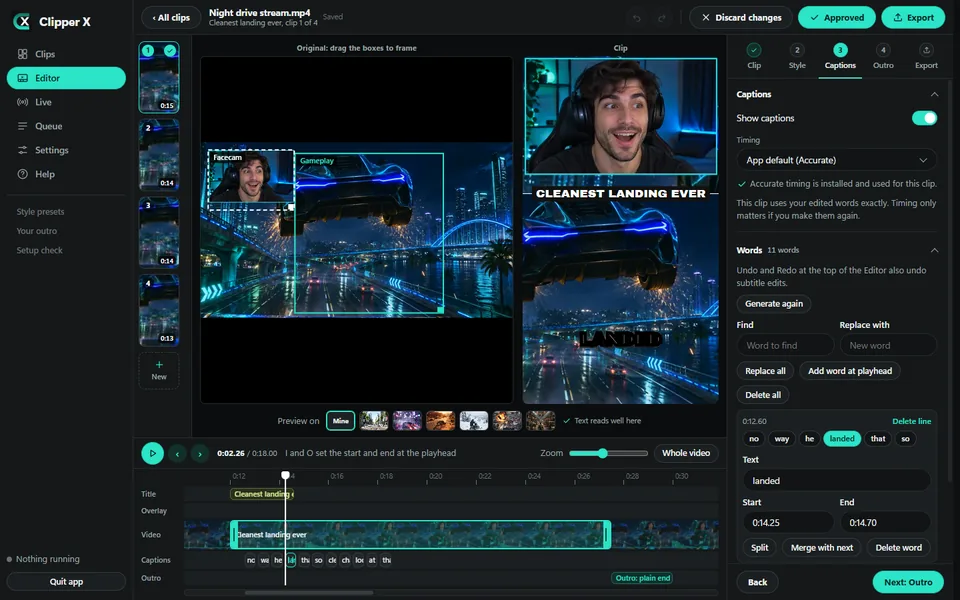
Captions
Captions are made on your PC, one clip at a time. Automatic speech recognition is set up for English.
- Go to step 3 Captions and make sure Show captions is on.
- Under Words, press Generate subtitles and wait for “Listening to this clip...” to finish.
- Click a word. The video jumps to it and the edit box opens.
- Change its Text, or use Split, Merge with next, Delete word or a new Start and End.
- Fix a repeated mistake with Find, Replace with and Replace all.
Press Add word at playhead to add a word. On the Captions track, drag a word’s edges to change how long it shows. Timing sets how closely words follow the speech.
Export uses exactly the words you see here. If you skip this step, the app makes captions during export.
Step 10
Outro
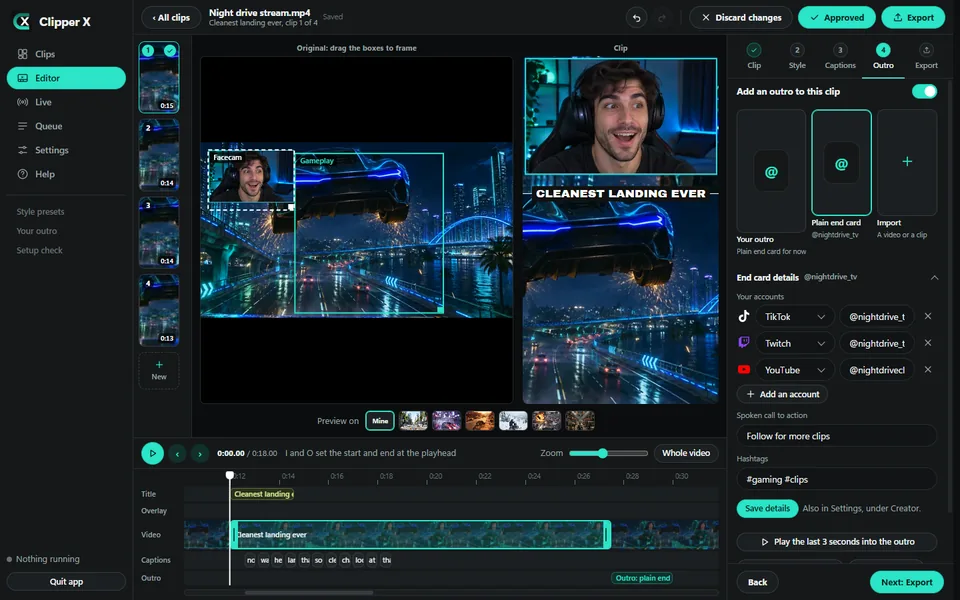
An outro plays at the end of your clip. Go to step 4 Outro and turn on Add an outro to this clip. Then click a tile:
- Your outro: your own short video, imported on the Your outro page under the menu.
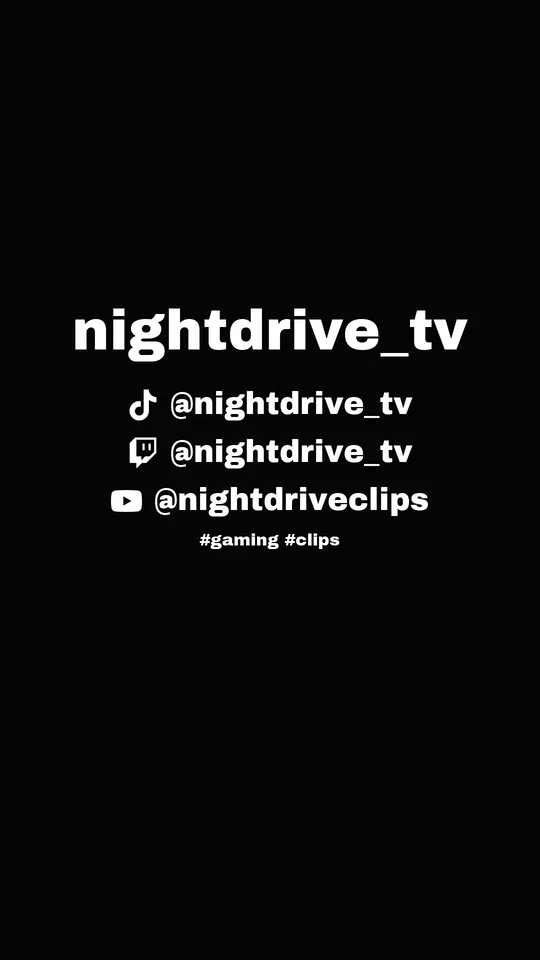
- Plain end card: your handle and accounts on a plain background. It needs a Creator handle.
- Import: use a video file or a part of a clip. It is saved as its own outro.
Under End card details, add Your accounts: pick a platform, like TikTok, Twitch or YouTube, and type your handle. Press Add an account for more. Each account shows with its logo on the end card. Then press Save details. They are also in Settings, under Creator.
Clipper X does not include an outro video. For your own, vertical 9:16 is best, ideally 1080x1920 and about 8 seconds. It can be 0.5 to 30 seconds. Use only video and audio you have the right to use.
Step 11
Export
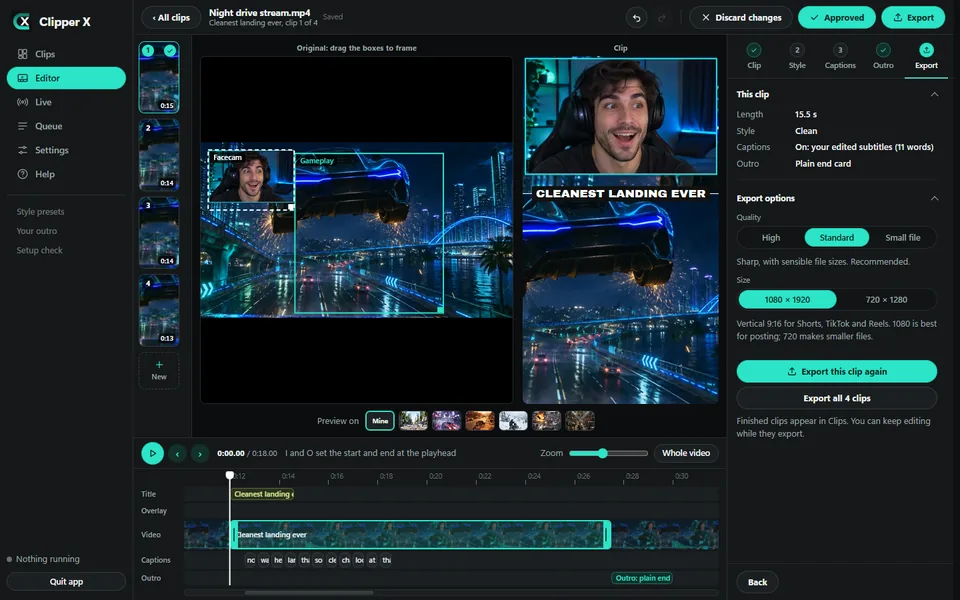
Open the Export step. It shows a summary of the clip: its length, style, captions and outro.
- Quality: High, Standard (recommended) or Small file.
- Size: 1080 × 1920 is best for posting. 720 × 1280 makes smaller files.
Then press Export this clip, Export all approved or Export all. Export at the top does the same for the open clip.
Finished clips appear in Clips. You can keep editing meanwhile. Exports wait in line and run one at a time. Exporting again makes a new file and keeps the old one.

Step 12
Live clipping
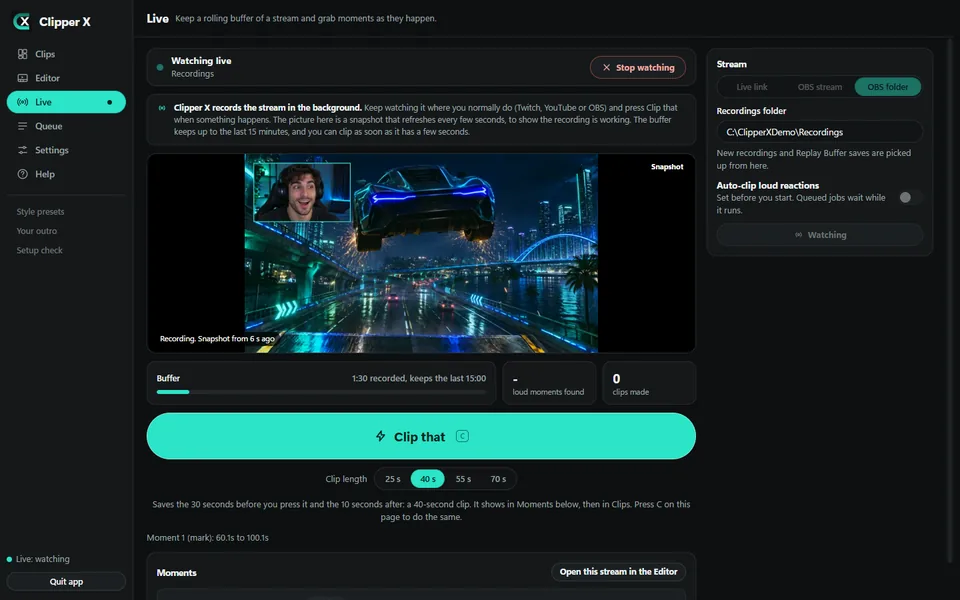
Live records your stream in the background, so you can grab a moment just after it happens. Keep watching where you normally do. The picture on the page is a snapshot that refreshes every few seconds.
- Open Live. In the Stream panel, choose Live link, OBS stream or OBS folder.
- Fill in the link, stream key or Recordings folder. For a link, read the warning and tick its box.
- Press Start watching.
- Pick a Clip length: 25, 40, 55 or 70 seconds. That is 15, 30, 45 or 60 seconds before your press, plus 10 seconds after it.
- Press Clip that right after a moment, or press C on this page.
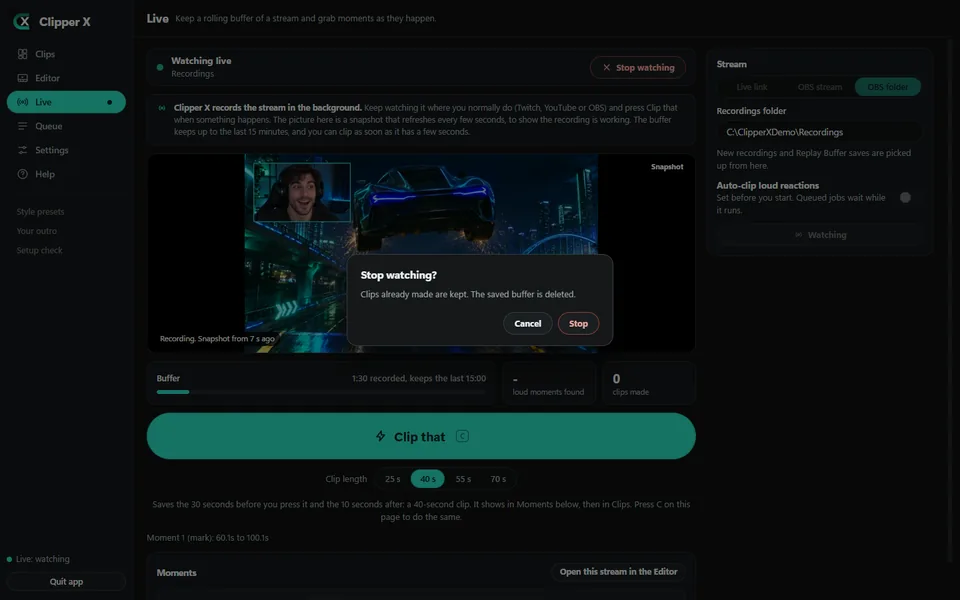
- Press Stop watching, then Stop to confirm.
Finished clips appear in Clips. The buffer keeps up to the last 15 minutes. Turn on Auto-clip loud reactions before you start to let Clipper X look for sudden loud moments. It stops watching after 5 finished clips.
Step 13
Queue
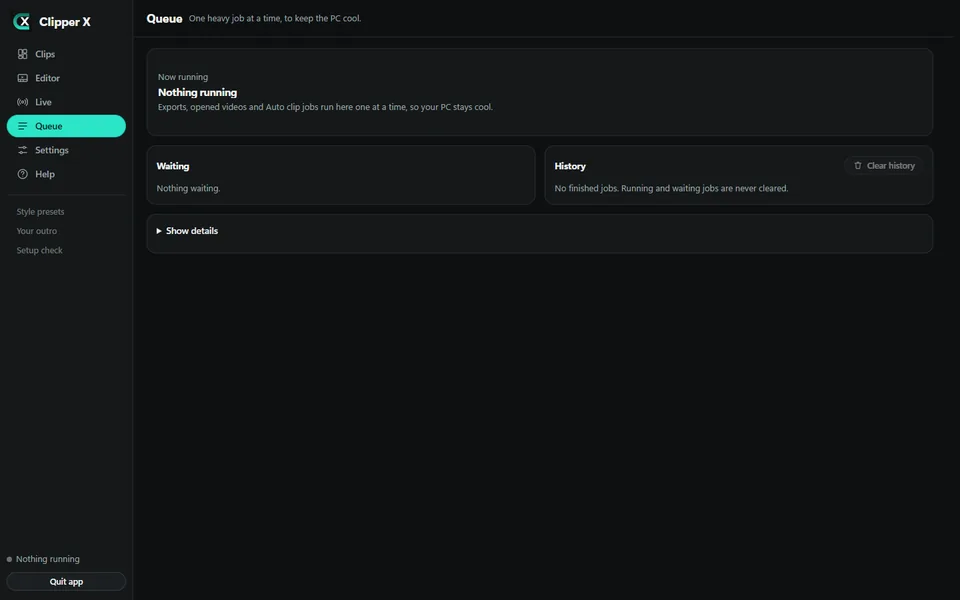
Exports, opened videos and Auto clip jobs run here one at a time, so your PC stays cool.
- Now running: the job in progress. To cancel it, press Stop and confirm.
- Waiting: jobs in line. Press x next to one to take it out.
- History: finished jobs. Clear history removes them from the list.
The bottom of the left menu always shows what is running.
Step 14
Settings
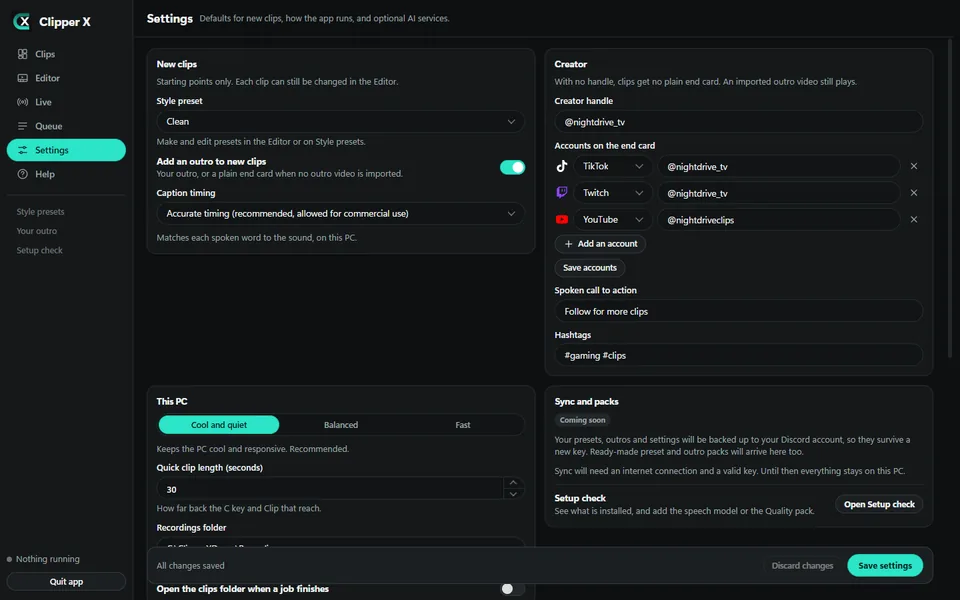
- New clips: the Style preset, Add an outro to new clips and Caption timing for new clips.
- Creator: your Creator handle, the Accounts on the end card, a Spoken call to action and Hashtags.
- This PC: Cool and quiet is recommended. Balanced and Fast finish sooner but make more heat and noise.
- Quick clip length (seconds): how far back C and Clip that reach, from 5 to 180.
- Your Recordings folder, and Open the clips folder when a job finishes.
- Open Setup check, to add the speech model or the Quality pack.
Press Save settings. The new settings apply to jobs you start afterwards.
Need help?
Open Help in the app. It has a short guide for every part of Clipper X, with a search box.
Still stuck? Open a ticket on the Clipper X Discord. Give your License ID, shown under License at the bottom of the left menu, and never post your key.
Join the Discord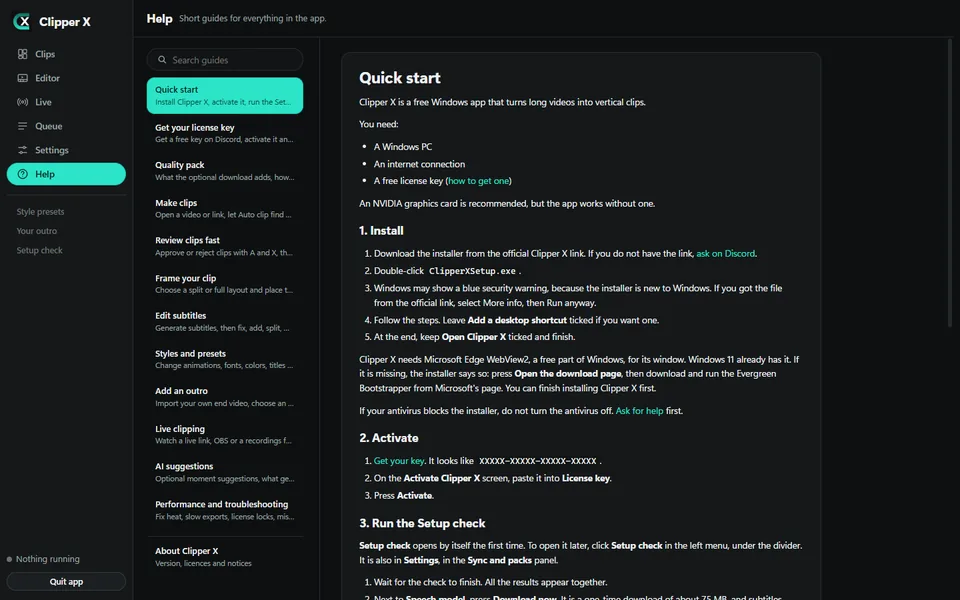
The demo video in these screenshots was made for this guide from the site’s own AI-generated sample images. The accounts shown are made up. Only clip content you own or have permission to use.